Pages


Wednesday, November 9, 2011

Bedroom Re-dos

My girls.  They never really had a finished room.  Not even a nursery.  We started to do it while I was pregnant and then I was put in the hospital for the second half of the pregnancy.  Hubby did the best he could, but we ended up just settling for some mis-matched furniture and no real theme.  I thought I would re-do it when they moved into toddler beds at 3, but nope....still didn't.

I'm not sure how this all got started.  I think it had something to do with my friend Nancy and I at last month's Fishhawk Garage Sale.  I told her we were thinking of bunk beds for the girls, but they had to be the ones with the stairs (the ladder ones just made me nervous).  So we looked at several that day but didn't find exactly what I had in mind.   But about a week later, Nancy sent an email with the exact bunk beds I was looking for....on Craig's List. In excellent condition.  At a ridiculously good price.  Sold.

I always told BP that I thought - when the time was right - we would give the girls our bedroom furniture and buy new stuff for us.  We paid $200 for our bedroom set at an estate sale in 2002.  It's from 1963 (there's a stamp on the back of the mirror that says so).  It just made more sense to give 4-year-olds furniture that was still nice...but not brand new.  So that meant we had to buy new furniture for us.  (See how I did that??)

Here's some pics of the girls' new room.  I found the bedding and accessories at Target.  It's called Love n' Nature Collection and it's just the cutest.  I was worried Breena wouldn't like it because it wasn't purple, but she actually loves it.


BP really wanted to keep the papasan because he sits there with them at night before bed to read.  I agreed but said I wanted a new cushion.  Then I looked up how much new cushions for those things were.  Yikes.  So I found a DIY papasan cushion slipcover tutorial and I'm going to attempt to make a cover that coordinates with their room much better... and at about a 1/3 of the price of a brand new one.

I still have decorating to do.  I want to frame some pictures to put up and I want to put their names on the wall somehow.  But they love their new room.

And I love mine!

Here's the sage-y green color it was before:

And here's what it looks like now:
The furniture isn't white...it's more of an off-white with a dark wood top.  It's also a distressed, shabby-chic   (BP had a hard time coming to terms with the fact that we bought brand new furniture that looks old and used on purpose.)  I wanted an iron bed.  He wanted wood.  This was our compromise.

Here's some more pics:
We got rid of the awful vertical blinds over the slider and replaced them with grommet topped panels in a deep red to match the bedding. (not sure why this pic is so dark)
The mirror that goes on this dresser was broken during delivery.  We should have the replacement by Friday.

I still have some decorating to do in here, but I love how peaceful and light it now is.  Unlike a lot of homes in Florida, all of our trim and doors are a cherry instead of the usual white.  Putting light colored furniture in this room really brightened it up.

Now....what can I re-do next....????

Wednesday, October 26, 2011

Whoooooo is ready for fall...??

Details on how to make this cute owl box using Paper Layerz by Megan Elizabeth will be available here starting November 1!

Tuesday, October 4, 2011

Halloween Decor

I went a little crazy with the October kit from Club Ruby.  I just couldn't stop making Halloween decorations for the house...

Here's the mantle over my fireplace.   I made the framed sign on the left and the Halloween banner.

Then I dressed up the hall tree in my foyer with a paper flower topiary, a scary skull hanging, an upcycled box and vinyl spiders - complete with rhinestone eyes:

Directions for all my projects can be found under my profile on ClubRubyDesigners.com.

Now...go scrap something!

Thursday, September 29, 2011

Halloween Cake Pops

Bakerella makes it looks sooooo easy.

This is my first attempt at cake pops.    (Ok, technically my second attempt.  Most of the first batch got pitched. Ok, ok...so I ATE most of them, then threw out the rest.)  Luckily my four-year-olds do not care how lumpy, bumpy and demented my jack-o-lanterns look.  They just say ' You're the best mommy EVER for making us lollipops!'

Thursday, September 22, 2011

October Kit *Sneak Peek*!

I am having SO much fun with the October kit from http://www.clubrubydesigners.com.

I just finished up an awesome home decor project that is already pretty-ing up my foyer for the coming season. Here's a pic:

Be sure to check back after October 1 to see how it all turned out!

Monday, September 12, 2011

*WINNER*

The winner of the Gypsy A-Z DVD from the Above Rubies Studios 21 Days of Giveaways is:

The Bradenburgs!


Email me at britten@aboverubiesstudio.com to claim your prize!!

Sunday, September 4, 2011

Drippy Goo - Not just for Halloween

When I went in my scrap area today to clean up after yesterday's project, I spotted my Martha Stewart Drippy Goo punch, sitting right where I left it.  And suddenly....I had an idea.

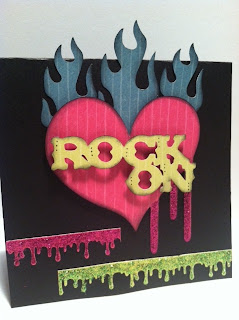
I wasn't in a Halloween-ie mood...more dark...kind of... edgy... (maybe because of my new hair color...? )  Hmmm...so the question was....can I make Drippy Goo --  rock n' roll???

I grabbed my Gypsy and started scrolling through my cartridges, waiting for inspiration to hit.  AH-HA!  Rock Princess!  An obvious choice for a rock n' roll card....but was there something that would work with the Goo??  And then I found the perfect one and some accessories to go with it.  Of course, then I had to select the right paper...

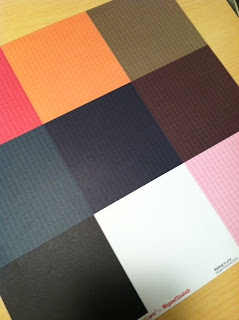
I loved the hot pink, greens and blues on this sheet of Paper Layerz.  And even though these weren't really layered images, Paper Layerz still worked because the colors coordinated so well.  No digging through my scraps or hacking into 12x12 sheets for just a small cut.  Everything I needed was all on one piece of paper.

I cut out the images I wanted, then hit the edges with a little Distress Ink in Black Soot...


I adhered my Rock Princess die cuts to a 5x5 card of black cardstock with my ATG and foam squares, punched some scraps with the Drippy Goo, added a generous amount of Magenta and Lime Green Stickles....and in minutes (not counting the Stickles drying time) I had my Drippy Rock Star Card!

Anyone have any other non-traditional suggestions for Drippy Goo....??   Let me know and I'll try them out and post them here later this week!


Friday, September 2, 2011

GIVEAWAY!!!

Woot!  Woot!  It's my first blog GIVEAWAY!

Megan over at Above Rubies Studio has been hosting 21 DAYS OF GIVEAWAYS and today is my day to play!  I'm giving away Megan's super popular Gypsy A-Z DVD!

I've also got a Halloween card tutorial for you using Paper Layerz - Megan's innovative new line of paper.  I love, love, LOVE this paper and best of all, it's now available at http://www.aboverubiesstudio.com!

In order to be eligible to win, make sure you:
*become a follower on my blog
*leave a comment on this post
*and make sure you leave a comment on Megan's post at AboveRubiesStudio for another chance to win!

Winners will be announced on September 8th on Megan's live UStream!

Now for the card:


I picked this PaperLayerz design because of the subtle  pattern and the colors were perfect for the images I wanted to cut.


I cut the witch and all her layers from the Wrap It Up Cricut cartridge.  One of the best things about Paper Layerz is that it's printed on Cut Mates cardstock...which means beautiful, perfect cuts - even with the smallest details - every time.

Here's my witch - all layers assembled.

I used a piece of Kraft cardstock as the base of my Halloween card.  My favorite card size is 5x5 and I used the popular Martha Stewart Drippy Good border punch along the bottom, then punched a matching border out of Paper Layerz.

I used (my new) Lacy Labels Lite cartridge to cut this cute die and then stamped the Trick or Treat sentiment with a Studio G stamp from the $1 bin at Michael's.


I don't t think you can have a Halloween card without some Stickles.  I used Copper here.


Viola!

Don't forget to sign up to follow my blog AND leave a comment for your chance to win the Gypsy A-Z DVD!!

Wednesday, August 31, 2011

Club Ruby September Kit *Sneak Peek*

Tomorrow is September 1.  Already.  How did that happen?

I have a love/hate relationship with this month.  It's my birthday month (the 21st if anyone is thinking of sending a present) and who doesn't love gifts and cake.  But I do NOT like being one year closer to 4-0.

Anyway...enough about me and my issues with getting older...

The September Club Ruby kit is packed with scrap goodness.  Here's a card I made with just some of the papers and cute button brads from the September kit and my new Bloom Lite Cricut cart that I picked up on clearance at Walmart:

Check out http://www.clubrubydesigners.com starting tomorrow to see tons more projects using this kit from our awesome design team.   This kit  - and any past ones that didn't sell out  - can be ordered from http://www.craft-e-corner.com.

Tuesday, August 30, 2011

The Weekend

What a crafty and wonderful weekend I've had!

Megan - my boss over at Club Ruby Designers - (who has also become a fabulous friend) - has been here in Florida for an extended weekend and we've been having such a fun time - as well as getting some much needed work done.  She arrived with a lengthy To Do list and an e-Craft in her suitcase, so I knew we would be getting down to business:


I did drag her away from the house for a bit to take her to an awesome scrapbook store called Violette's  in Lakeland, FL.  It's a good 45 minute ride from my house, but it's totally worth the drive.  Of course we had to stop at Michael's, have lunch at Panera Bread, a caffeine stop at Starbucks (if you ever find yourself at Starbucks with Megan, note that you might be there awhile....her coffee order is very specific and borders on diva-like  *insert eye roll here*).   We also got a chance to check out the newest products and catalog from Close to My Heart at consultant Adeline Brill's Open House.  (Thanks for having us Adeline!)  Megan also got to meet my scrappy friend Darlene, who just started her own blog where she will be posting all of her fabulous creations.  

We finished up the weekend with a fish bowl sized fruity drink:


 and bowling:

Of course, Megan also did some videos while she was here and she even got me in front of the camera.  To see me squirm, go HERE.  After you watch the video, make sure you leave a comment for a chance to win a Cricut Cartridge from Craft-E-Corner and stay tuned for more giveaways over at AboveRubiesStudio.com.

Wednesday, August 24, 2011

The eCraft Has Arrived

As I turned into my neighborhood last night on the way home from the Y, there was a UPS truck in front of me.  As he made the left at the stop sign, I began praying to the Scrapbooking Gods (or Goddesses) that he was on his way to my address.  As he wound around the corner, I got more excited and when he stopped in front of my house, I barely remembered to put the car in park before I leaped out and started jumping up and down in the driveway.

Here is what that wonderful man in brown had for me:
Yes, my scrappy friends....thanks to my wonderful boss Megan at Club Ruby Designers and the generous geniuses at Craftwell, I am now the proud owner of an eCraft cutting machine!

Now those of you who know me, know I have been an avid Cricut user since hubby bought me my first machine for Christmas in 2007.  Four years later, I now have 3 Cricut machines, a Gypsy that I couldn't live without, and over 50 cartridges.  But I have been intrigued by the eCraft since I first saw it at an expo several years ago.

There is a few things that makes the eCraft different from the Cricut.  The first is that is does NOT need a cutting mat.  Paper can be fed through the front of the machine or loaded into a tray on the back.  It also comes with a roller attachment if you are cutting a long length of paper.

After registering my new machine on their site, I was able to download software that allows you to (very easily) import and cut any .svg file on the internet...which is HUGE.  There are tons of free .svg files out there, as well as ones you can purchase for a dollar or two.  I spent some time playing with the software last night and I found it user friendly and fun.  I accessed the help screen and learned in just a minute how to weld a word and then with a click, sent that word to the eCraft to cut.  Woot!  Woot!

I have big plans for this machine, but as with all new toys, there is a learning curve so I have some practicing to do.  Stay tuned for updates!!

Don't forget about the 21 Days of Giveaways going on right now over at AboveRubiesStudio.  I'll be having a giveaway here on my blog in September. Don't miss out on your chance to win!!

Friday, August 19, 2011

Check out THIS new paper line

I was lucky enough to be invited to the CHA Convention in Chicago last month....and it was AWESOME.  I was there promoting a fantastic new line of paper - Paper Layerz by Megan Elizabeth.


Megan designed Paper Layerz to make coordinting and layering your die-cut images faster, cheaper and easier.  Each 12x12 sheet is segmented into 9, 4x4 blocks so you can cut out all the layers of an image from just ONE sheet of Paperlayerz.  Think about popular Cricut cartridges like Create-A-Critter, Florals Embellished and Everyday Paperdolls.  Imagine not having to dig through your scraps looking for coordinating colors or *gasp* having to cut into a 12x12 sheet just for one small piece.  And here's another bonus:  Paper Layerz is printed on Cut Mates Cardstock.  Cut Mates is cardstock designed specifically for use in die-cutting machines - Cricut, E-Craft, Sizzix, Silhouette, Slice....perfect cuts every time without rips or tears.  I personally cut hundreds of images in the 3 days of doing Paper Layerz demos at CHA last month and I never once had to re-cut an image.  How amazing is that?!?!?

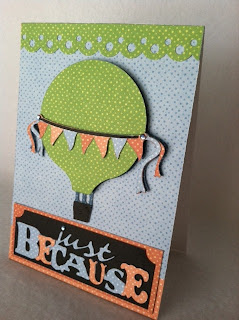
Here's some cards that I made using Paper Layerz.  We had these on display in our CHA booth:


Megan is my boss over at ClubRubyDesigners.com where I am a part of her Executive Design Team.  She is also the brains and talent behind AboveRubiesStudio.com, which is where you can get all of Megan's super popular DVD's.  If you want tips and tricks for using your Cricut, Gypsy or Cricut Imagine and if you want to see the latest products, tools and techniques in the papercrafting industry - Megan has the inside scoop on them all, what works (what doesn't) and where you can find it...go check out ARS right now!

UPDATE 8/24:  Paper Layerz is available RIGHT NOW at the AboveRubiesStudio.com store.  Get yours now before they sell out!!


Monday, June 6, 2011

Published Again....(well, sort of)

As part of my Executive Design Team position over at Club Ruby Designers, I was asked to come up with some beach-themed projects for an ad for Club Ruby and Craft-e-Corner that would be published in a June issue of one of Northridge Publishing magazines.  I didn't know for sure which magazine the ad would be in, so when I was at my local Joann store yesterday I picked up June's issue of Cards magazine just to see if maybe it was in there.... and there was the ad on page 11!

Here's the magazine it's in:
And here is the ad:
You can find instructions (and my byline!) for these projects here on Craft-e-Corner's website.  All materials used were from the Be Thankful November Club Ruby kit which is available for purchase here.

Sunday, May 15, 2011

Remember when...

...I used to blog?

Yeah, me neither.

Thursday, April 14, 2011

Tim Holtz Pocketwatch

I picked this awesome little trinket up at the Scrapbook Expo last weekend. We were doing a make-n-take and the instructor was wearing one. It looked so cool, I bought one just to see what I could fit in it!

The back pops off and I happened to have a circle punch that was the exact size of the watch. So I punched a piece of scrap paper and then glued the brad and the tiny key and attached the rhinestone for a pop of color. I didn't have to glue down the paper, so I will be able to easily change the inside.

I love wearable art!!


Monday, March 28, 2011

Club Ruby Design Team - OPEN CALL!

Click HERE to find out how you can be a part of our fantastic design team.

All the details are on the CRD blog...but don't wait!  The call is only open for 2 weeks - so get to work!

Friday, March 25, 2011

It's Here!

The April/May issue of Cricut magazine is finally here and my project is in it!!

Check out the pics below:
(my name is printed really tiny under the second pic!)

The pictures and instructions take up four pages!

This is my very first submission for publication, so I am so excited that it made it!